Hello there, bees. Recently, the Binance Smart Chain (BSC) to xDai Chain bridge was opened in beta. With the introduction of bsc-to-xdai bridge, it is now possible to use Binance as an on-ramp and bridge your funds to xDai, where you can enjoy almost feeless trading experience. I decided to write this step-by-step guide as I have seen that not many people are aware of this opportunity. And considering the high gas fees on Ethereum mainnet, I think this provides a great alternative.
First of all, I should mention that there’s a specific issue with the tokens of BSC. As tokens on BSC are not the native Ethereum tokens and Binance-Peg equivalents of those tokens, when you bridge over from BSC to xDai, the token minted is not the native equivalent on xDai.
Note: I strongly suggest you not to bridge over any token other than Dai and USDC using the bsc-to-xdai bridge as you will not be able to find liquidity for Binance-Peg tokens on the xDai side to trade them.
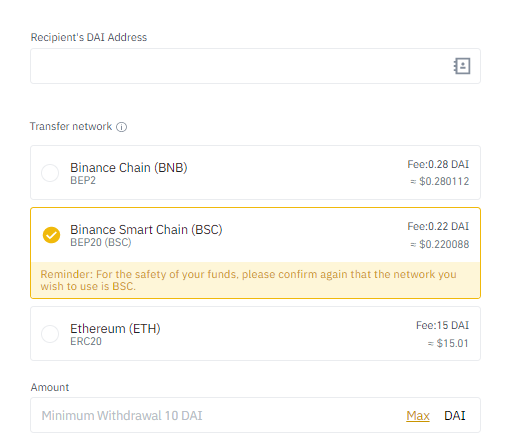
Step 1 – Withdraw DAI from Binance to BEP20 address:
Just put your Metamask wallet address to Recipient Address section in the following image. And do not forget to select BEP20 to withdraw tokens.
Step 2 – Adding Binance Smart Chain as Custom RPC to Your Metamask
Now that you have withdrawn your DAI to your BSC wallet, you should add BSC to your Metamask as a Custom RPC to be able to connect to BSC network to use the bridge. For this, you should set the RPC parameters on Metamask, and it should look like the following:
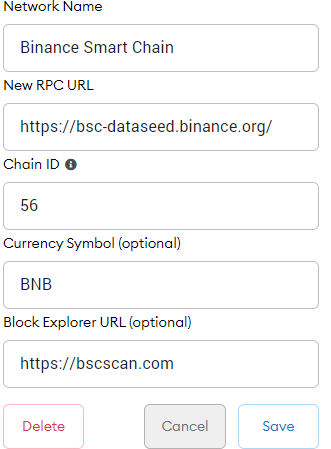
And you can also find alternative RPC URLs on this link: https://docs.binance.org/smart-chain/developer/rpc.html
Step 3 – Using BSC-to-xDai Bridge
In order to bridge your DAI from BSC network to xDai network, you should go to this link:
To use the bridge, you need to choose BSC on your Metamask to be able to see your funds on the bridge. When connected to the bridge on BSC network, your DAI will be shown on the left, which in turn will give you Dai Stable Coin on xDai after you approve spending limit and transfer your funds.

Note: In order to use the bridge, you will need to have some BNB in your wallet to cover the transaction fees on BSC side.
Step 4 – Swapping Dai Stablecoin on xDai to wxDai.
Now that you have bridged over your Dai from BSC network. You are ready to swap those Dai to wxDai in order to be able to trade with them on Honeyswap. For this, you will use Component Finance.
Go to https://xdai.component.finance/ and connect to the website with your wallet, set for xDai network. To add xDai network as a Custom RPC on your Metamask, you should do the same when you were adding BSC as a Custom RPC. However, this time, it should look like the following:
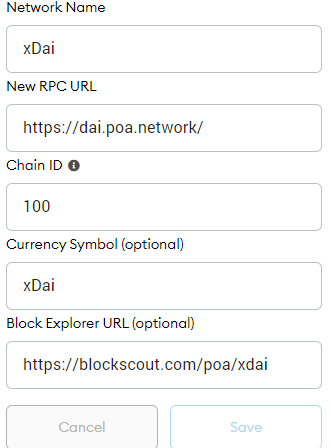
And you can find a list of alternative RPC URLs for xDai on our Wiki: https://wiki.1hive.org/guides/xdai#connecting-via-metamask
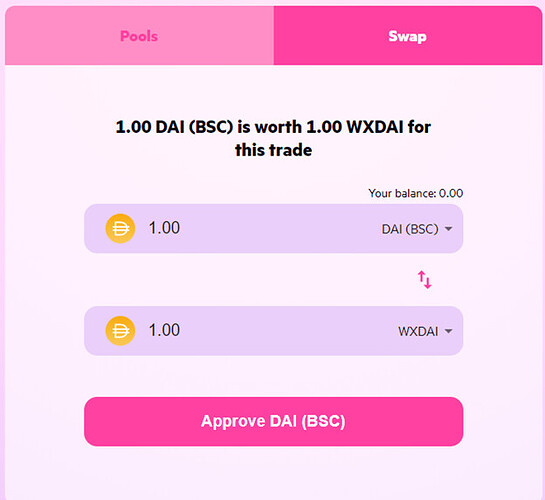
After connecting to https://xdai.component.finance/ with your Metamask, you should click on Swap tab and choose DAI (BSC) and WXDAI like in the following screenshot:
Approving the transaction and swapping, wxDai, which has liquidity and usable for trades on Honeyswap.
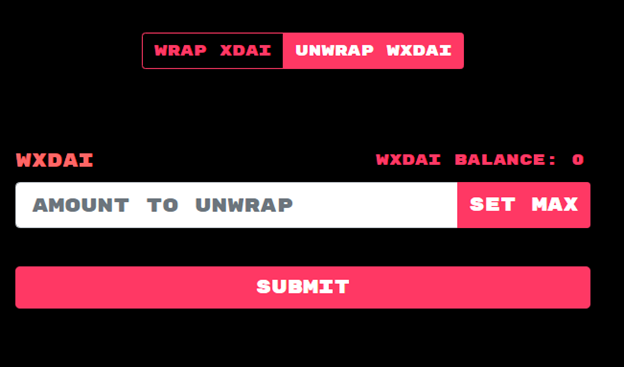
And you can also unwrap your wxDai using the https://wrapeth.com/ website as well.
Note: If you do not have any xDai in your wallet to cover the transaction fees for swapping your DAI (BSC) to wxDai, you are lucky as you can use the xDai faucet to get 0.01 xDai, which will be enough to cover most of your transactions.
If you think I missed anything, please let me know so that we can improve this tutorial, guys.
And here is a great video tutorial by @D0SH following the same steps, just adding one more, using pancakeswap, which is also possible to swap your bnb to dai 

